10 PPT Activities for Online Teaching – 01: Multiple Choice
This post introduces the Multiple Choice activity from the 10 PPT Activities for Online Teaching series. It's one of the most versatile classroom activities for boosting teacher-student interaction — and it doubles as a beginner's guide to PowerPoint's Trigger feature, which unlocks a whole world of interactive possibilities.
For all online teaching activity resources, visit the Online Teaching Resource Hub, which covers interactive PowerPoint, Google tools, and more.
A Quick Word on Online Teaching Activities
I’ve been in the online teaching space for a while now, and the part I enjoy most is learning about and applying new technology. This series is my way of sharing some of the activities I’ve found most useful.
A lot of people assume online teaching is just moving a physical class onto a platform like Google Meet or Teams — but a truly engaging online lesson involves a lot more thought and care than that.
When you think of online teaching, you might picture all sorts of fancy new tech and flashy materials. But I’d caution against assuming more technology always equals better teaching. Any tool needs to actually serve your lesson. If students have to spend time learning, switching to, or downloading something, that’s instructional time you’re losing. Ask yourself: how much of the class will actually use this? If it’s 20 minutes of a lesson and students only need to learn it once, great. But if an activity takes 5 minutes and involves constant app-switching and account registration, there are probably better options.
I once observed a demo lesson where the teacher was clearly talented — but all that back-and-forth between slides and external tools chewed up time that could have been saved entirely.
So this series focuses on animations and effects within PowerPoint itself — simple tools, high engagement.
What the Multiple Choice Activity Is For
Multiple choice is probably the most common classroom activity format out there. Done well, it can achieve:
- Teacher-student interaction
- Checking students’ comprehension and retention
- (Advanced) Team competitions
You could simply use a basic “Appear” animation to reveal the correct answer when clicked — but that feels a bit flat. What if a student picks wrong? That’s where PowerPoint’s Trigger feature comes in. With triggers, you can make the answer reveal respond to which option the teacher clicks, creating a real interactive feel.
Below I’ll walk through how to build this Multiple Choice activity step by step. If you’d rather skip straight to a ready-made file, you can download the template here (if the file won’t open after downloading, see this guide). I’ll also show you how to edit the template with your own questions.
Software used: PowerPoint 2019 (this activity is compatible with older versions — leave a comment if you run into issues) Template font: Gen Ryu Min TTF Heavy (free font, download from GitHub)
Building from Scratch: Multiple Choice in PPT
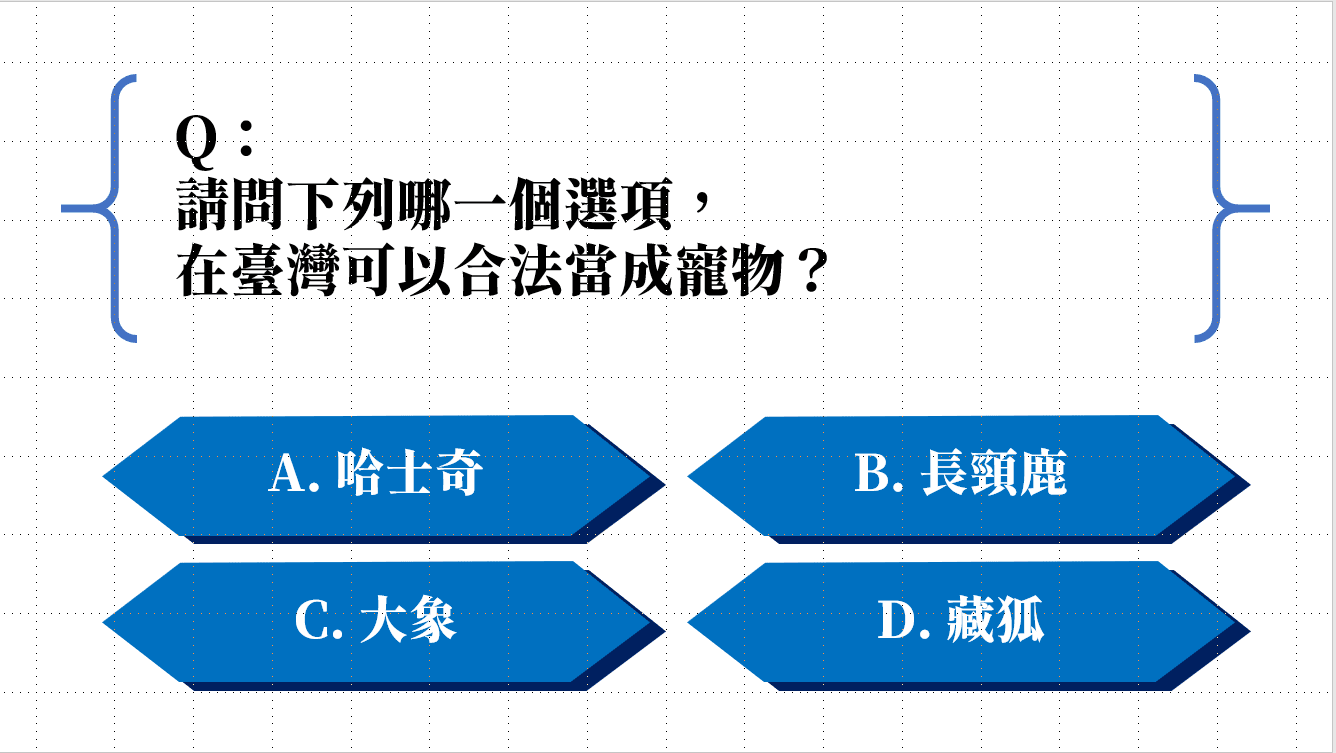
Step 01 — Set up your slide layout
Start by designing your slide to include the question and the answer choices (A, B, C, D). You can follow my layout as a reference:
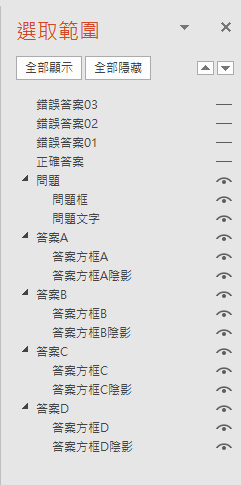
While you’re at it, I highly recommend using the Selection Pane in PowerPoint.
When a slide has lots of overlapping elements — text, shapes, borders, backgrounds — it can get confusing fast. To open the Selection Pane, go to Home in the top toolbar, then find Select (usually all the way to the right), and click Selection Pane.

Once open, you’ll see a list of every element on your slide. Click any item in the list and it gets selected on the slide — double-click to rename it. You can also toggle visibility with the eye icon on the right to temporarily hide elements while you work.
I’ll be referring to elements by name in all my tutorials, so I’d recommend naming yours as you go :)
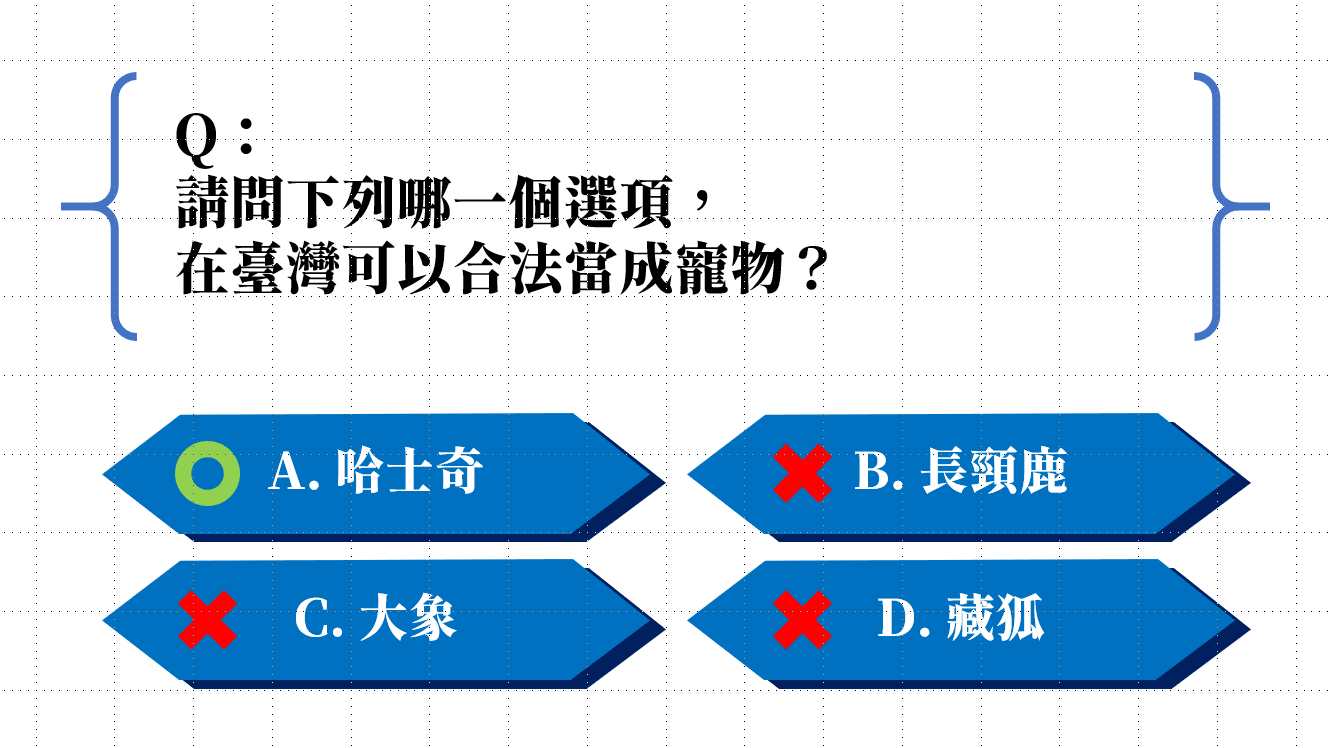
Step 02 — Create correct/incorrect indicators
Now design what appears when a student answers correctly or incorrectly. In my template, I use a circle (〇) for correct and an X (╳) for wrong — but you could just as easily change the answer choices to green or red. Whatever works for you.
For this, I used PowerPoint’s built-in icon insertion. Place them where they should appear on the slide:
Step 03 — Add animations
Now for the fun part — animations!
Our goal: nothing is shown at the start; when the teacher clicks an answer option, the correct/incorrect indicator for that option appears.
If you’ve taken one of my classes, you’ll know I teach animations as “3+1 types”:
- Enter: the element doesn’t exist yet — the animation makes it appear
- (Emphasis): the element already exists — the animation highlights it
- Exit: the element exists — the animation makes it disappear
- Motion Path: the element exists — the animation moves it
Every PowerPoint animation, no matter how complex, comes down to one of these four. So let’s break down what we need here:
- Emphasis — to highlight which answer option was clicked
- Enter — to reveal the correct/incorrect indicator
Let’s go. First, add an Emphasis animation to each of the four answer choices (A, B, C, D). I use the “Pulse” effect.
Then, add an Enter animation to each of the three wrong indicators and the one correct indicator. I use the “Appear” effect.
Feel free to experiment with other effects!
Step 04 — Add Triggers
So far we’ve got some animations, but they just play in sequence when the teacher advances the slide — not very interactive.
This is where triggers come in. Think of a trigger as a switch: the animation only fires when you click a specific object.
Let’s think about what the trigger should be here: we want clicking an answer choice to reveal whether that choice is right or wrong. The trigger is tied to the answer options themselves.
Open the Animation Pane, then do the following:
Select the “Answer A” Emphasis animation → click Trigger → On Click of → Answer A; Select the “Answer B” Emphasis animation → Trigger → On Click of → Answer B; Select the “Answer C” Emphasis animation → Trigger → On Click of → Answer C; Select the “Answer D” Emphasis animation → Trigger → On Click of → Answer D.
This means: clicking Answer A fires the Emphasis animation on Answer A, and so on.
Next, move the “Appear” animations in the Animation Pane — drag the correct answer’s indicator under the correct answer’s trigger, and the wrong indicators under their respective triggers. Your Animation Pane should now look something like this:
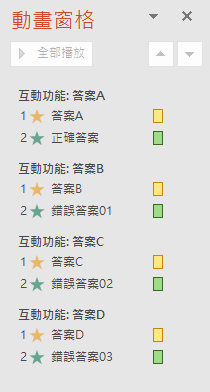
Almost there! One last thing: in the Animation Pane, click the green “Appear” animations, and in the dropdown that appears, select Start With Previous. Done!
Step 05 — Multiple slides
If you have multiple questions, you don’t need to redo all these steps for each slide. Just duplicate the slide, swap out the text, and drag the correct answer’s indicator to the right position.
Using the Template: Multiple Choice in PPT
If building from scratch feels like too much, just grab my template:
Template_Multiple Choice Download
The file has four slides — one for each correct answer (A, B, C, D). (If the file won’t open, see this guide)
Pick the slide that matches your correct answer, then click on the question and answer text to edit it directly.
That’s it for this one! Mastering the Trigger feature is genuinely one of the most useful PowerPoint skills you can pick up — it opens the door to all kinds of interactive activities.
I hope this was helpful. If you have any questions or requests for activities to cover, feel free to leave a comment anytime!
And of course, these same activities work just as well in a physical classroom — with even more room for customization. Have fun exploring :)
For all PowerPoint activities in the Online Teaching series, see:

10 PPT Activities for Online Teaching – 13: Lottery Adventure RPG
Iju Hsu · 2021/06/28 · 12 comments
This post introduces the Lottery Adventure RPG from the 10 PPT Activities for Online Teaching series — a pixel-art style adventure game built into a PowerPoint presentation, where students feel like they’re completing quests as they work through course content.
Thanks again, and happy teaching!
Thanks for reading :D
If you enjoyed this post, feel free to click the coffee button in the lower right to support us and give Lottery a can 🐾
Comments