10 PPT Activities for Online Teaching — 08 Whack-a-Mole
This post covers the Whack-a-Mole activity from the 10 PPT Activities for Online Teaching series — a pixel-art-style interactive Q&A game where animals pop up with answer choices for students to pick from.
Before diving in, I’d recommend reading the first post in this series, which covers the goals and key considerations for online teaching activities.
For all online teaching activity resources, visit the Online Teaching Resource Hub — interactive PowerPoints, Google tools, useful apps, and more.
What This Activity Is For
Whack-a-Mole is a familiar concept — though this version gets a pixel-art makeover. (I also never found a mole image I liked XD, so I swapped moles for animals instead.)
At its core, this is just a Q&A activity with a fun twist — still question and answer, just a lot more entertaining XD
One caveat: due to PowerPoint’s limitations, the animals can’t appear randomly, and students can’t actually “whack” them — the teacher controls everything. A bit of a pity, but it still works well in practice.
No step-by-step tutorial needed here — just download the template and go!
How it works:
- The teacher poses a question, and animals pop up alongside answer choices (the order is pre-set by the teacher)
- When a choice appears, students call out which one they think is correct — clicking it reveals whether they’re right or wrong
- After a correct answer, you advance to the next round
Instructions below show you how to customize the template (click here to download — if it won’t open after downloading, see this troubleshooting guide).
Requirements:
Software: PowerPoint 2019 (this activity is compatible with older versions of PowerPoint — feel free to leave a comment if you run into issues)
Template font: GenSekiGothic B (free font, download here)
Using the Template: Whack-a-Mole in PPT
Download the file below first (if it won’t open, see this guide):
Template_Whack-a-Mole Download
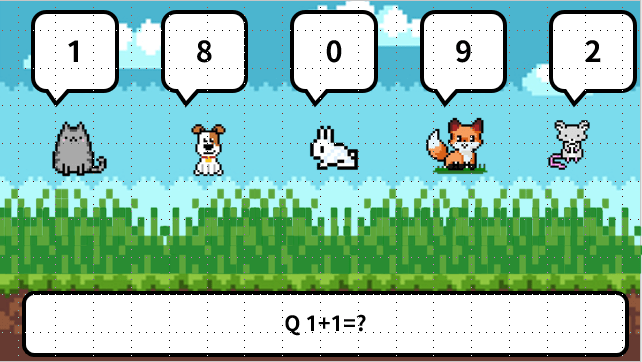
Once downloaded, you’ll see five slides — each one shows a scenario where a different animal has the correct answer (e.g., slide 1 = the rightmost mouse is correct, slide 2 = the second-from-right fox is correct). Duplicate the slide as many times as you need questions (ten questions = ten copies).
Once you’re in the file, open the Selection Pane first (click here for instructions — go to Home → Select → Selection Pane). Hiding the correct/incorrect layers first makes editing much easier. What you can edit:
- Answer choices: Cat-speak, Dog-speak, Rabbit-speak, Fox-speak, Mouse-speak
- Question text: Q
- Animation Pane:
- The rise and fall duration for each animal
- The order animals pop up: select all four entries for an animal group (“Mouse, Mouse-text, Mouse, Mouse-text”) and drag them to the desired position in the animation sequence. The first group must be set to trigger “On Click”; all subsequent groups must be set to “After Previous.” [Advanced — don’t touch unless you understand what you’re doing]
When you’re done editing, make sure all elements in the Selection Pane are set to visible. That’s it!
It’s best not to modify anything else — the animations can easily break.
Hope this is helpful!
If you have any questions, or there’s an activity type you’d love to see, feel free to leave a comment anytime!
For all PowerPoint activities in the online teaching series, see the latest post in the series.
Thanks again — wishing everyone smooth and enjoyable online teaching!
Thanks for reading :D
If you enjoyed this post, feel free to click the coffee button in the lower right to support us and give Lottery a can 🐾
Comments