Google Tools for Teachers (1): Google Forms Quiz with Auto-Grading — Build One from Scratch
A step-by-step guide to building a quiz or test using Google Forms, complete with auto-grading and auto-scoring. Useful for both online and in-person teaching, from initial setup to distributing the form to students.
For all online teaching resources, visit the Online Teaching Resource Hub, which covers interactive PowerPoints, Google tools, and other useful materials.
Building a Quiz with Google Forms
Teachers often need to give students quizzes and tests — and there are dozens of tools out there to create them. Google Forms, however, is a particularly fast and practical option: it supports auto-grading, integrates with Google Classroom, and can export results to Google Sheets for further scoring.
Curious to see what it looks like? Try the sample quiz.
You’ll see the full student-facing experience — and if you enter your email address, you’ll receive the feedback sheet that students would normally get.
If this looks like it fits your needs, follow along and we’ll build one from scratch together :)
If you need to create quizzes in bulk, you may also want to check out this post. Write your questions in a spreadsheet and convert them into a quiz with one click:
Google Tools for Teachers (4): Google Sheets to Forms — Form Builder Add-on for Fast Quiz Conversion
How to convert a Word quiz to Google Forms faster (by Teacher Yujen Lien)
Building from Scratch: Google Forms Quiz
Step 01 — Open Google Drive and Create a Form
You can search for “Google Form” directly, but I strongly recommend starting from Google Drive. Think of Google Drive as a full file manager — everything else you create lives here in one place rather than scattered across tabs.
In Google Drive, navigate to the folder where you want to keep the quiz, or create a new one via the New button in the top-left corner → New Folder.
Then, in the same New menu, select Google Forms to open a blank form.
Step 02 — Overview of the Form Interface
Here’s what a blank form looks like. I’ve highlighted the key features, which I’ll walk through one by one.
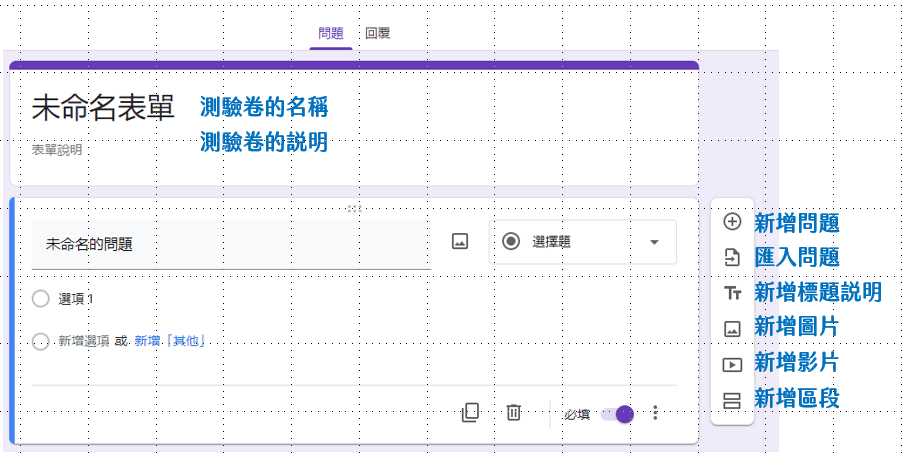
Quiz title: The name students will see. E.g., “2021/05/21 Chinese Language — Quiz 3”
Quiz description: Instructions or notes visible to students. A good place for anything important.
Add question: Covered in the next section.
Import questions: Bring in questions from an existing form.
Add title and description: Use this to label sections — for example, “Questions 1–5: Multiple Choice (1 point each)” — so students understand the format and scoring.
Add image: Adds an image.
Add video: Adds a video.
Add section: Splits the quiz into separate sections.
Step 03 — Switch the Form to “Quiz” Mode
This is the most important step. Click the gear icon (Settings) in the top-right corner (just to the left of the Send button), go to the Quizzes tab, and turn on Make this a quiz. This is what transforms the form from a survey into a gradeable test.
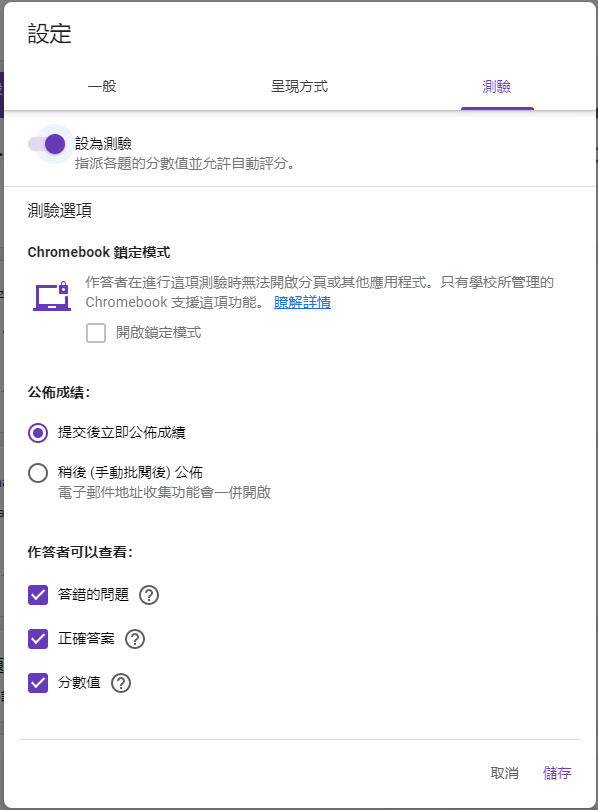
A few important settings here:
Release grade: Choose whether to release scores immediately after submission (as in the sample quiz) or only after manual review.
Respondent can see: Controls what students can view after submitting — missed questions, correct answers, point values, etc. I’ve enabled all options in the sample so you can see everything.
Step 04 — Adding Questions
Click Add question to add a new item. The following question types are available — the sample quiz demonstrates all of them, and I’ve labeled each one in the description field:
- Short answer: Short text responses, fill-in-the-blank, entering a name or student ID, etc.
- Paragraph: For longer written responses. Note: these cannot be auto-graded — if you assign a point value, students will automatically receive 0. The sample demonstrates this behavior.
- Multiple choice: Single-answer questions.
- Checkboxes: Multi-select questions.
- Dropdown: Single-answer with a dropdown menu.
- File upload: For submitting assignment files.
- Linear scale: Rarely used in quizzes; better for surveys. Cannot be auto-graded (same as paragraph).
- Multiple-choice grid: Useful for certain single-answer formats.
- Checkbox grid: Useful for certain multi-select formats.
- Date: Selects a date. Cannot be auto-graded.
- Time: Selects a time. Cannot be auto-graded.
Here’s a closer look at a multiple-choice question. Most options are self-explanatory; the important one is the Required toggle in the bottom-right — if a question must be answered before submitting, make sure to enable this.
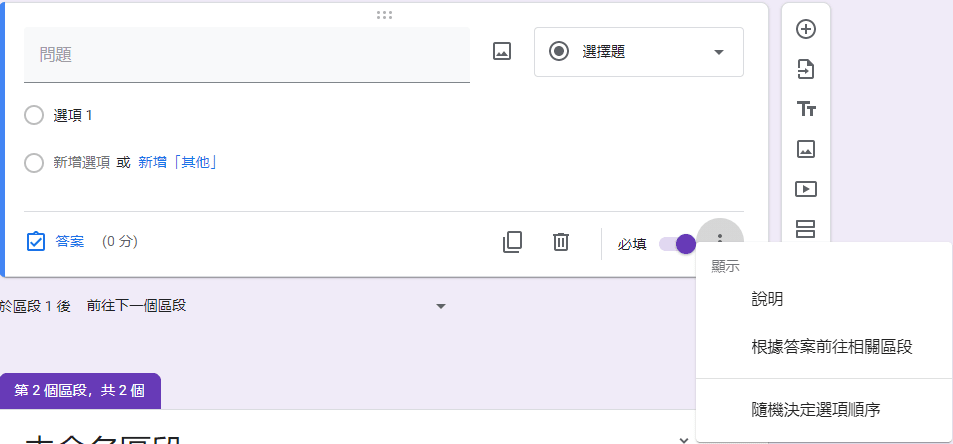
The three-dot menu in the bottom-right also reveals a few useful options:
Description: Adds a note below the question. Most questions in the sample quiz have this enabled.
Go to section based on answer: Logic branching — routes students to a different section based on their answer. Most quizzes won’t need this.
Shuffle option order: Randomizes the answer choices, which can help prevent students from sharing answers.
The other critical feature is the blue Answer key link in the bottom-left. Click this to set up auto-grading for a question. Here’s what it looks like for a short-answer question:
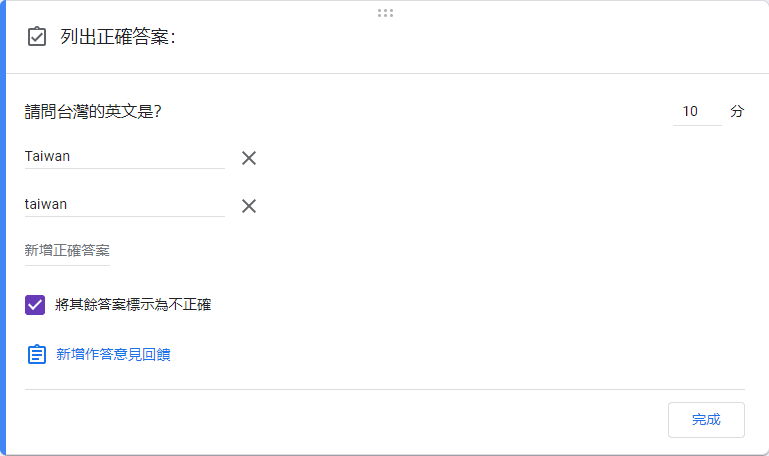
For a question asking “What is the English name for Taiwan?”, you’d enter the correct answers in the text field. I listed two accepted answers — “Taiwan” and “taiwan” — to account for capitalization differences.
The top-right field sets the point value for this question.
If you want to give students feedback after they answer, click Add answer feedback — you can see examples in the sample quiz.
For questions that can’t be auto-graded, remember to go back to Step 03 and change the score release to Later, after manual review.
Now go ahead and finish building your quiz!
Step 05 — Review Your Quiz
Once you’ve added all the questions, check the following:
- Have you added a short-answer question for students to enter their name, email address, or other identifying information?
- Is the form set to Quiz mode? Should grades be released immediately or after manual review? Can students see which questions they got wrong?
- Have you set point values and correct answers for all gradeable questions?
When everything looks good, click the eye icon in the top-right corner to preview the student-facing version. Then you’re ready to send it out.
Step 06 — Customize the Quiz Appearance (Optional)
Click the palette icon in the top-right to change the color scheme and background. Feel free to explore :D
Step 07 — Distributing the Quiz
Go to Settings (gear icon) and double-check the following:
General: Collect email addresses? Require sign-in? Allow multiple submissions? Allow response editing? Show summary charts? (I’ve enabled the last two so you can see what they look like.)
Presentation: Show progress bar lets students track how far along they are. Shuffle question order randomizes all questions — best used when all questions are the same type. Show link to submit another response adds a link after submission. Confirmation message is what students see after completing the quiz.
Then click the Send button in the top-right:
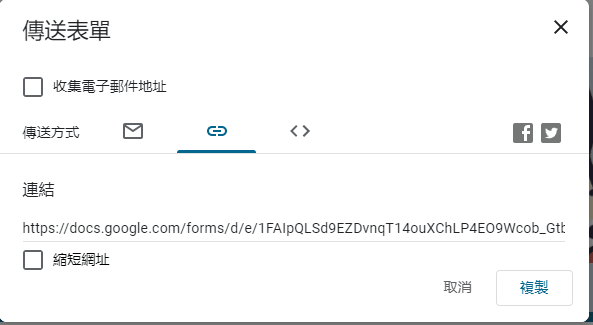
Select the link option, then share that link with your students. Shortening the URL is recommended for easier sharing.
Checking Student Responses
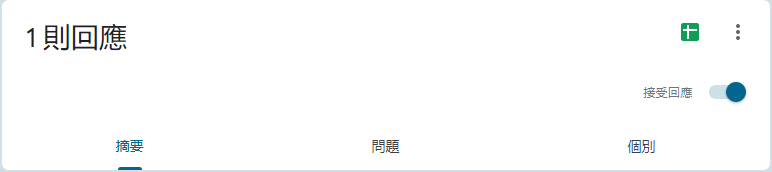
Once the quiz is out, you can monitor responses from the form’s Responses tab. The number next to it shows how many submissions have come in.
Accepting responses: Toggle this off when you no longer want new submissions.
Summary: A high-level overview of score distributions and overall results.
Question: How students answered each individual question.
Individual: Browse each student’s responses — useful for checking a specific student’s work.
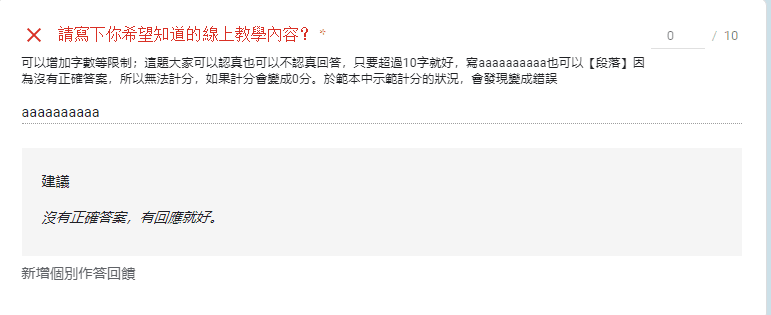
As mentioned earlier, some question types cannot be auto-graded (e.g., paragraph questions). But you can still grade them manually. For example, in the sample quiz, the paragraph question normally scores 0 — but in the Individual tab, you can find that question, review the student’s response, and manually change the 0/10 to whatever score you’d like to give. You can also click Add individual feedback to leave a comment for that student.
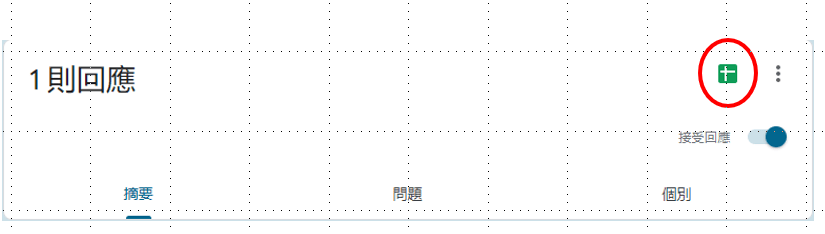
Finally, click this button to create a linked Google Spreadsheet — you’ll be able to view all grades at a glance and calculate directly, just like in Excel.
That covers the core workflow. In a future post, I’ll also show how to use spreadsheet functions to automatically populate grades into your class roster, and how to select the best scores from multiple attempts.
I hope this was helpful!
If you have questions or topics you’d like me to cover, feel free to leave a comment anytime.
For all interactive PowerPoint teaching activities, see:

Online Teaching: 10 Useful PPT Activities and Templates — 13 Lottery’s Big Adventure RPG
Iju Hsu · 2021/06/28 · 12 comments
This post introduces the “Lottery’s Big Adventure RPG” — a pixel-art style adventure game built in PowerPoint that blends course content with gameplay, giving students the feeling of clearing levels.

Online Teaching: 10 Useful PPT Activities and Templates — 12 Snakes and Ladders (with myViewBoard)
Iju Hsu · 2021/06/24 · 5 comments
This post introduces “Snakes and Ladders” — a PowerPoint activity combined with myViewBoard. It works great as a group competition game, and the element of chance keeps things exciting.

Teaching Presentation Design — 04: 40 Free Image Resources: Photos, Icons, and Illustrations All in One!
Iju Hsu · 2021/06/20 · 13 comments
A roundup of free image resources for teachers, covering Creative Commons licensing and categorized by type: general, photos, icons, illustrations, typography, and more.
Thanks again, and I hope your online teaching goes smoothly!
Q&A
Q: How can I include reading passages or other content types in a quiz?
A: Within Google Forms, you can use the Add title and description feature to insert reading passages as a section header. You can also add a URL in the question description — linking to an article or a downloadable file — and have students answer based on what they’ve read.
Q: I’d like to learn about Seesaw.
A: I haven’t used it yet — I’ll share my thoughts once I give it a try!
Q: How do I get students to show up to class on time?
A: Same problem as in-person teaching, honestly XD Taking attendance is a classic solution. If late arrivals are a recurring issue, consider starting with a warm-up activity — something for early arrivals to think about or work on — so students who come on time aren’t just sitting around waiting.
Q: How do I prevent cheating on quizzes?
A: Two main approaches:
(1) Settings → Quizzes → Select Chromebook lockdown mode (very restrictive, and rarely feasible in Taiwan)
(2) Limit students to one attempt and randomize option order:
Settings → Quizzes → Release grades: Later (after manual review)
Settings → Quizzes → Uncheck “Missed questions” and “Correct answers”
Settings → Presentation → Check “Shuffle question order” (note: this may also shuffle the name field, but it’s not a big deal)
Settings → Presentation → Uncheck “Show link to submit another response”
Settings → General → Uncheck “Response receipts”
Settings → Check “Limit to 1 response”
Settings → Uncheck “Edit after submit,” “See summary charts,” and “See previous responses”
Q: Any simple substitutes for a drawing tablet?
A: A drawing tablet isn’t strictly necessary (even though I use one myself). Unless you need precise handwriting or drawing, there are plenty of alternatives. Some teachers use an iPad with Apple Pencil, which works great. If budget is a concern, you can try a two-device setup: watch your students on your computer while using your phone as a camera pointed at paper on your desk — it actually works quite well!
Q: Can students see the answer key? I’ve been worried about this.
A: Students can only see what you choose to show them. Refer to the “How do I prevent cheating?” answer above for the exact settings — it’s all in your control.
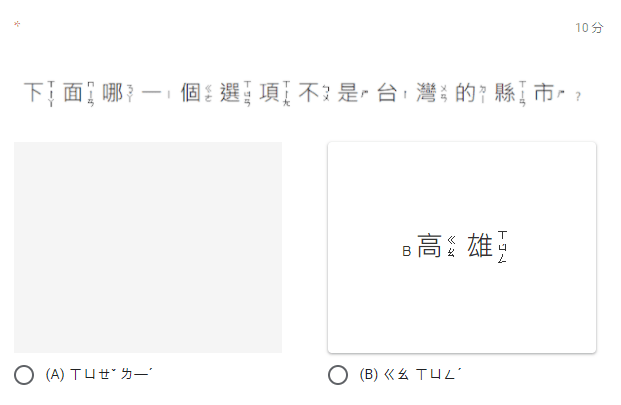
Q: How do I make a quiz with phonetic symbols (bopomofo) for first-graders who can’t read many characters yet?
A: For phonetic symbols, the most practical approach is to insert them as images. Both question text and answer choices can include images — for example:
Q: When I download responses, the file comes out as garbled text. What’s wrong?
A: I just tested this — if you download directly from Google Forms, yes, it can come out garbled. The fix: open the responses in Google Sheets first, then go to File → Download. That version should be clean. Give it a try :)
Q: My subject is English, and students sometimes add an extra space or use a different punctuation format, which the system marks as wrong. Any workarounds?
A: Unfortunately there’s no perfect fix. A few options: 1) Remind students in the description field to avoid extra spaces, 2) Add common variations as accepted correct answers, 3) Switch to manual grading. It’s genuinely tricky to prevent entirely — hang in there!
Q: Can I give partial credit for checkbox (multi-select) questions?
A: Yes! Use the Checkboxes question type — it supports partial scoring.
Q: How do I encourage self-directed learning? And how do I get students to engage more actively?
A: This is the same challenge as in any classroom, honestly. Self-directed learning always comes down to interest and purpose. My main suggestion: find materials and activities that actually connect with what students care about.
Q: How do I improve the quality of video-based (synchronous) lessons?
A: In synchronous teaching, keeping students’ attention is everything. Use the chat function to interact with them regularly, and use breakout groups so students can talk to each other too. Keep their focus anchored in the session.
That said, synchronous lessons are mentally exhausting for everyone. A good rhythm might be: first half for content delivery, second half for a practice quiz or task-based activity — so students are actively doing something, not just watching.
Q: How do I know if students are actually paying attention?
A: Use the chat box for quick check-ins — for example, post a question like “What is another name for Li Bai?” and have everyone reply at once. Or say “If you think Student A’s answer was great, flood the chat with hearts ♥” — students find it fun and tend to stay engaged.
Also, you don’t have to fill the entire class time with lectures. Using the last 10 minutes for a short quiz is a natural and effective way to see what stuck.
Q: How should I handle assignment submission and grading, and what are the best testing approaches?
A: This post covers one testing method, but there are plenty of other tools and formats out there. Assessment doesn’t have to mean quantitative scoring — task-based evaluation is also valid. The right tool really depends on what learning outcomes you’re aiming for.
Q: What’s the key to asynchronous teaching? And how do I set up a timed quiz?
A: Asynchronous teaching is more similar to traditional classroom instruction than synchronous online teaching — I’m not as well-versed in it. Based on conversations with other teachers: keep videos short and split them into segments so students can rest; having a visible teacher presence (rather than just slides) helps maintain attention; and pairing video content with polls or quizzes keeps students engaged.
For timed quizzes, check out this post: Google Tools for Teachers (3): FormLimiter Add-on — Setting a Deadline for Your Quiz.
Q: How do I let students share their thoughts freely during class?
A: It depends on class size. Small classes: invite students to speak up or raise their hand anytime. Large classes: open discussion during the last segment of class, and let interested students stay behind afterward.
Also, the chat box is a surprisingly great equalizer — students who never speak up in person are often much more willing to write in chat.
Q: Can I assess students through open-ended questions, or does it have to be multiple choice?
A: As shown in this post, there are many question types available. For those without a single correct answer, just remember to set the score release to Later (after manual review) so you can grade them yourself before returning results.
Q: How do I take attendance in Google Meet with nearly 100 students?
A: Check out this tutorial by Teacher Yujen Lien: https://www.youtube.com/watch?v=ZnHpGbAPhyY&ab_channel=YujenLien
Q: How do I set the form up and configure scoring and time limits?
A: You can see each student’s submission timestamp in the collected responses. For setting a hard cutoff time, check out: Google Tools for Teachers (3): FormLimiter Add-on — Setting a Deadline for Your Quiz.
Q: How do I handle handwritten work, worksheets, and non-multiple-choice exercises online? How do I grade corrections efficiently?
A: For all non-auto-gradeable questions, I recommend setting the score release to Later (after manual review). You can grade everything yourself and then release it to students — and you can still leave individual feedback for each student’s correct and incorrect responses.
Q: I’m new to this — if I’m creating a middle school math quiz with geometric diagrams and math symbols, how do I do that? Copy-pasting just gives me garbled characters.
A: Two options:
- Create your question in whatever program you normally use, then insert it as an image.
- Install an add-on following the instructions in my third post — look for “Hypatia,” which lets you build equation content and then insert it into the form as an image :D
Q: How can I display or discuss student answers with the class?
A: If you want to show quiz results, you can download the response file and use it to display student answers to the group.
Q: Can I add an audio file to Google Forms? I want to include a listening component for my English class.
A: You can’t attach audio directly, but here’s a workaround: upload the audio file to Google Drive, copy the sharing link, and paste it into the question description field — students can click to download. Alternatively, convert the audio to a YouTube video — you can embed YouTube videos directly in a form :)
Thanks for reading :D
If you enjoyed this post, feel free to click the coffee button in the lower right to support us and give Lottery a can 🐾
Comments