10 PPT Activities for Online Teaching – 05: Bingo Machine (Slot Reel)
This post introduces the Bingo Machine activity from the 10 PPT Activities for Online Teaching series. It can be used for cold-calling, random topic selection, or grammar practice exercises. Add a Trigger switch and you have full control over when it starts and stops.
Before reading this post, I’d recommend starting with the first post in this series, which covers the basics of online teaching activity design and some important considerations. For all online teaching activity resources, visit the Online Teaching Resource Hub.
What the Bingo Machine Activity Is For
The Bingo Machine works similarly to a spinning wheel, but with a different mechanism and some unique possibilities. At its core, anything involving randomness is fair game — and for language classes, the animated scrolling reel is especially handy for grammar practice.
The main use case is simple:
- Random selection
Whether you’re selecting numbers, names, topics, or anything else, this activity has you covered.
Below I’ll walk through how to build the Bingo Machine from scratch. You can also download the template directly (if the file won’t open after downloading, see this guide) and modify it to fit your content. It takes a bit more setup than some activities, but it won’t take long — most of my time goes into making it look nice, honestly XD
There are two ways to control the machine, and they differ in how you pause and resume:
- Click the Spin button to start, click Spin again to stop
- Click Spin to play, press 1 on your keyboard to pause, press ~ to resume
The template comes in three versions. This post teaches the simplest one — the other two are just extensions of the same technique.
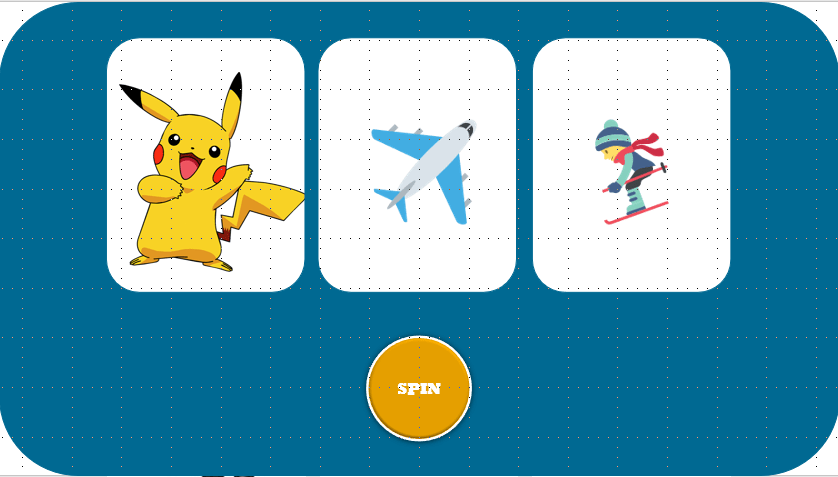
Version 1 uses images on the reel — more complex, but great for language class. For example, after teaching the sentence pattern “[Name] takes [transport] to [activity]”, you could use the Bingo Machine to randomly generate sentences like “Pikachu takes a plane to go snowboarding.”
It can also be used to prompt students to come up with their own stories.
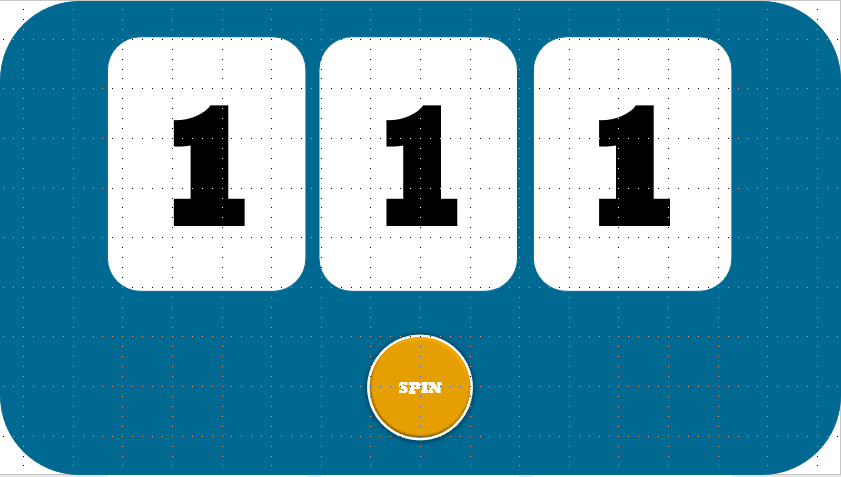
Version 2 is a numbers-only reel, like a classic Bingo machine. The numbers can be swapped out for text as well.
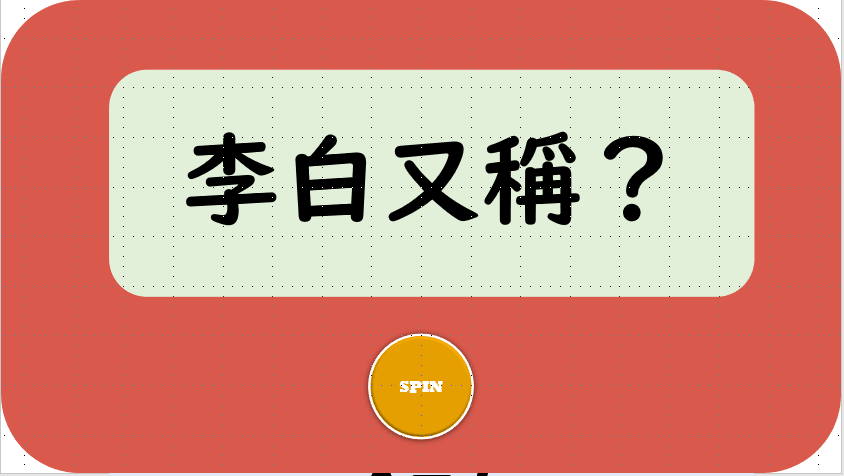
Version 3 is the simplest — just a single scrolling reel. It’s the most basic version, but works perfectly for cold-calling or topic selection.
Software used: PowerPoint 2019 (if you’re on an older version, one feature needs to be enabled first — see this guide, and feel free to leave a comment if you have trouble) Template font: UD Digi Kyokasho N-B (built into Windows, but it’s a Japanese font — some characters may be missing)
Building from Scratch: Bingo Machine in PPT
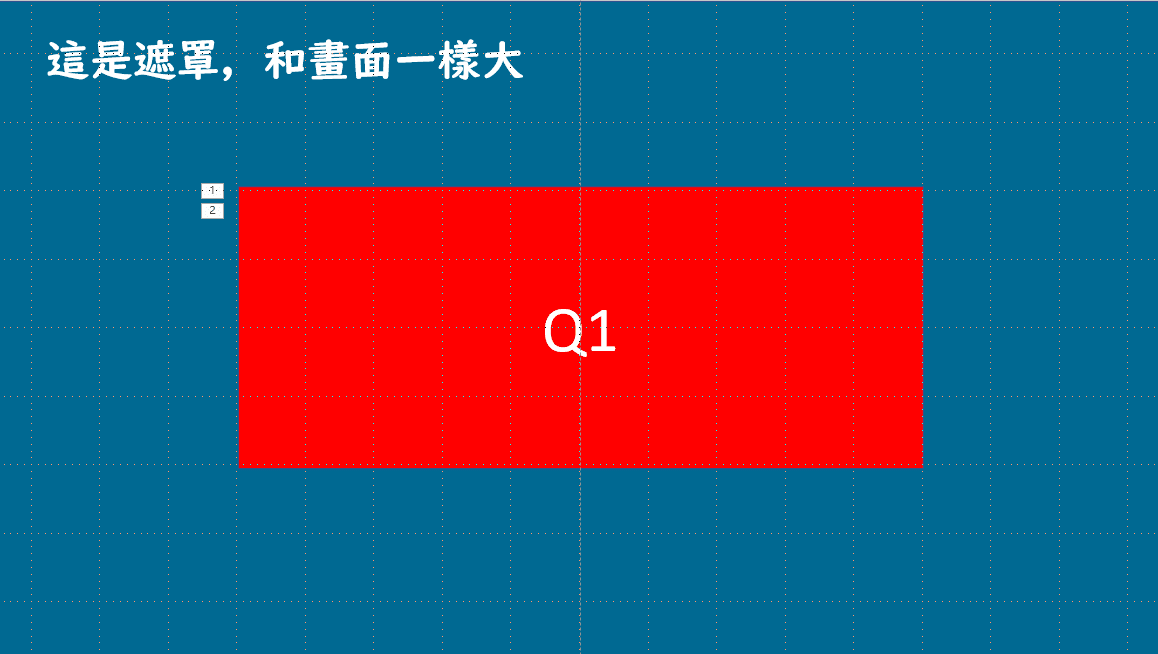
Step 01 — Draw the background and the visible window
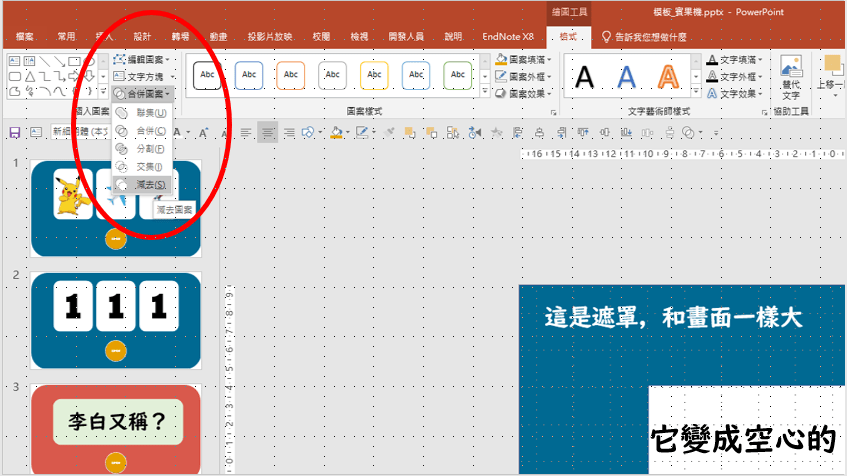
Go to Insert → Shapes and draw a rectangle that covers the entire slide (we’ll call this the mask).
Then draw a second, smaller rectangle — this represents the “window” where the scrolling reel will be visible.
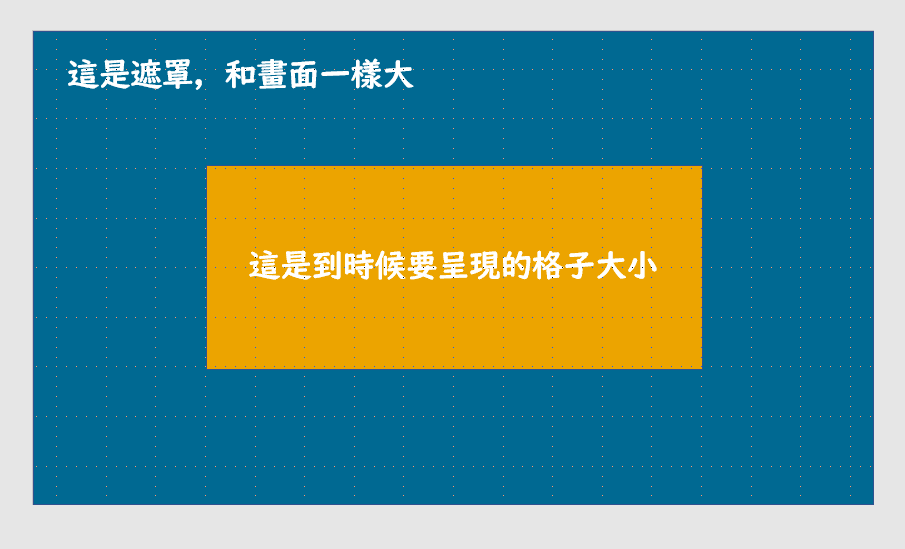
Step 02 — Use Merge Shapes to cut a hole in the mask
Order matters here. Click the mask (blue) first, then hold Shift and click the window rectangle (yellow). The Drawing Tools: Format tab should appear in the ribbon. Go to Merge Shapes → Subtract, and you’ll see the mask now has a hole cut out of it — that’s where the scrolling reel will show through.
Note: If you don’t see the Merge Shapes option, your PowerPoint version may be older. Follow this guide to enable it.
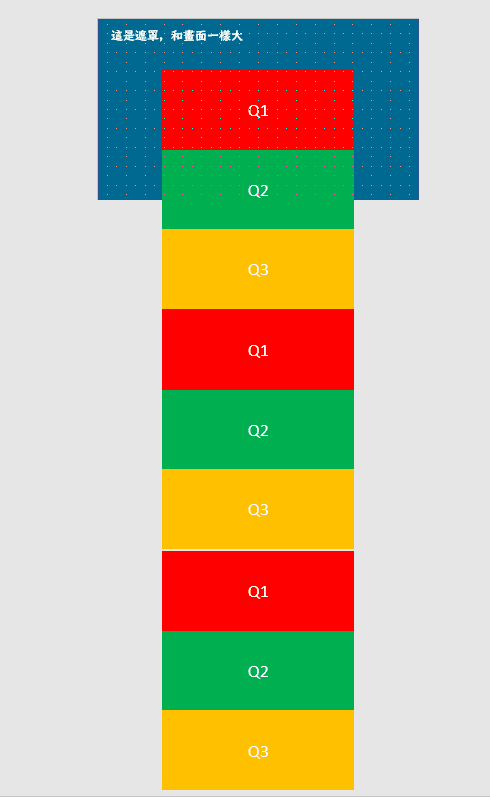
Step 04 — Build the scrolling reel
Now we create the moving reel. Draw another rectangle — slightly larger than the cut-out window.
Double-click the rectangle and type in your first item (call it Q1). Copy Q1 to make Q2 and place it directly below, then continue making Q3, Q4, and so on for however many items you need. Tip: hold Ctrl and drag to duplicate quickly.
Once you have all your items, select them all and go to Drawing Tools: Format → Group to group them into one object.
Note: If the view feels cramped, use the zoom slider in the bottom-right corner to adjust. More items = more convincing scrolling effect.
Step 05 — Add the animation
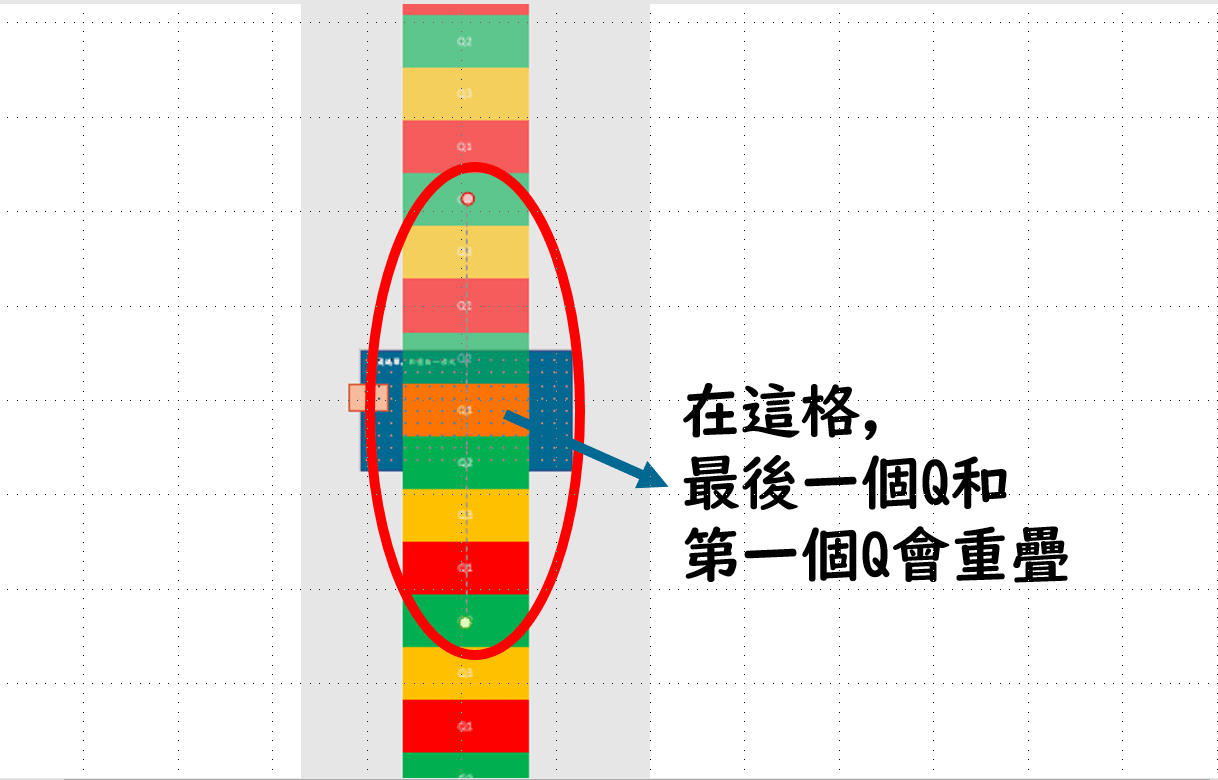
Now we apply a Motion Path animation to make the reel scroll. Open Animations, click Add Animation → More Motion Paths → Up. You’ll see a green dot (start) and a red dot (end) appear on your reel.
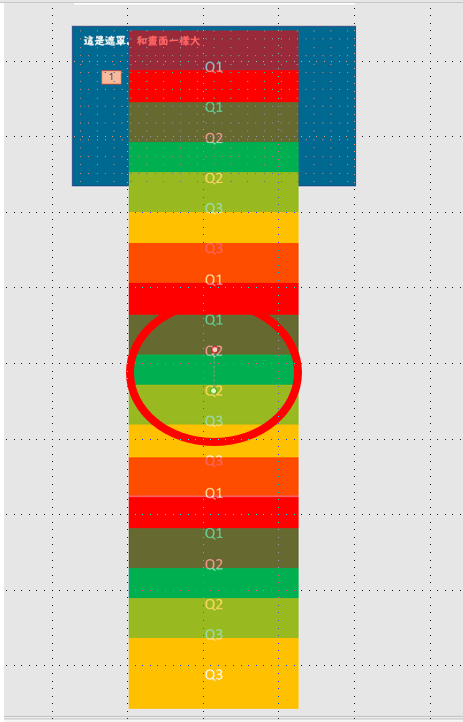
Click the red dot and drag it upward until the last item on the reel aligns with where the first item started. Press Play — the reel should scroll upward and stop at the last item.
Step 06 — Add a second animation
Select the reel again and add another animation: Add Animation → Appear.
Step 07 — Modify the animations
We want the reel to scroll up and then snap back to the start, so it loops. Open the Animation Pane, right-click the Motion Path animation, and select Effect Options. Make the following changes:
- [Effect] Auto-reverse: check this box
- [Timing] Duration: set to your preference (if you’re making multiple reels, giving each one a different speed adds to the effect)
- [Timing] Repeat: Until Next Click
Now play it — clicking once starts the reel, clicking again stops it.
Step 08 — Put the mask back
Finally, bring the mask back into view. Click the mask and go to Drawing Tools: Format → Bring Forward, and keep moving it forward until only the reel window is visible. Your Bingo Machine is complete!
Additional tip
If you want a dedicated on/off switch like in my version, you can use the Trigger feature covered in 10 PPT Activities – 01: Multiple Choice. I’d strongly recommend adding one — otherwise you’ll be clicking the previous-slide button constantly during playback, which gets old fast.
Using the Template: Bingo Machine in PPT
Download the template below (if the file won’t open, see this guide):
Template_Bingo Machine Download
The file has three slides, each using a different style and reel approach. Whichever version you’re editing: first open the Selection Pane (see this post for how), hide the mask by clicking its eye icon, and then start editing.
Template 1: Images
The reel is made by combining individual images with a long strip. You can swap out the images freely — just remember to group them again when you’re done.
Template 2: Text / Numbers
I used a long rectangle with text typed on it. You can replace the numbers with any text you like — just make sure the font size is set appropriately.
Template 3: Single topic
Text can be displayed in a single-item format as well — just replace the text content.
I hope this was helpful!
If you have any questions, or there’s an activity you’d like to see covered, feel free to leave a comment anytime.
For all PowerPoint activities in the Online Teaching series, see:

10 PPT Activities for Online Teaching – 13: Lottery Adventure RPG
Iju Hsu · 2021/06/28 · 12 comments
This post introduces the Lottery Adventure RPG from the 10 PPT Activities for Online Teaching series — a pixel-art adventure game built into a PowerPoint presentation that gives students the feeling of progressing through levels.
Thanks again, and happy teaching!
Thanks for reading :D
If you enjoyed this post, feel free to click the coffee button in the lower right to support us and give Lottery a can 🐾
Comments